Tony James has won four Australian and six State Combined Driving Championships in horse singles and pairs, he explains how to improve scores in dressage and cones through thorough preparation. First published in Carriage Driving October 2019
One of the benefits of driving an accurate dressage test is that we gain credibility with the judges, in that they think “Here is someone who knows what they are doing!” We can improve our performance in combined driving by being more accurate in our dressage test and cone course driving. This starts with walking the dressage arena – not the track of the test but to establish some transit lines so we can be very accurate – almost perfectly accurate. To achieve this, we start by walking into the arena and up the centreline noting a tree or light pole which is immediately behind C or the judge’s car. This helps you drive straight on the centre line. Stop at the point at which the horse’s nose is at X (you will be standing two or three metres short of X). At this point look across at the letters H and M and remember a tree or building behind one of the letters. This transit line will enable you to stop your horse accurately at X during the test. When driving up the centreline, keep your thumbs together so as you don’t waver on the centreline. Get a pen and a piece of paper now so you can draw this next bit. If the test then turns right down to a 20m circle at B, go to B and walk half way in to X, stop, turn left and walk 10m to the bottom of your circle. At this point look across the arena ahead of you for a couple of transit points such as a tree and a fencepost or corner of a building to enable you to arrive at X which is the halfway point of your circle in the test. From X walk halfway back to B then turn left and walk 10m to the top of the circle. Stop, turn right and seek two transit points such as two trees or a tree and a fencepost, to enable you to arrive here at the top of your circle in the test.
Repeat this procedure for the other 20m circle on the other side of the arena These transit line strategies also work for 30m and 40m circles. After that circle trot across the top of the arena to the diagonal HXK, then a five loop serpentine AFVBSRHC then MR and a 20m half circle right at B then a 20m half circle left at X. Use the same technique to establish transit lines for the half circles. For the halt at G, Walk to G during the arena walk and look over the top left or right arena corners to establish transit lines for your finishing halt at G. Transits also work for 10m and 15m deviations. Walk along the deviation to the maximum deviation point and look for transit lines which indicate that you have reached the 10 metres or 15metres, so that you complete the deviation accurately.
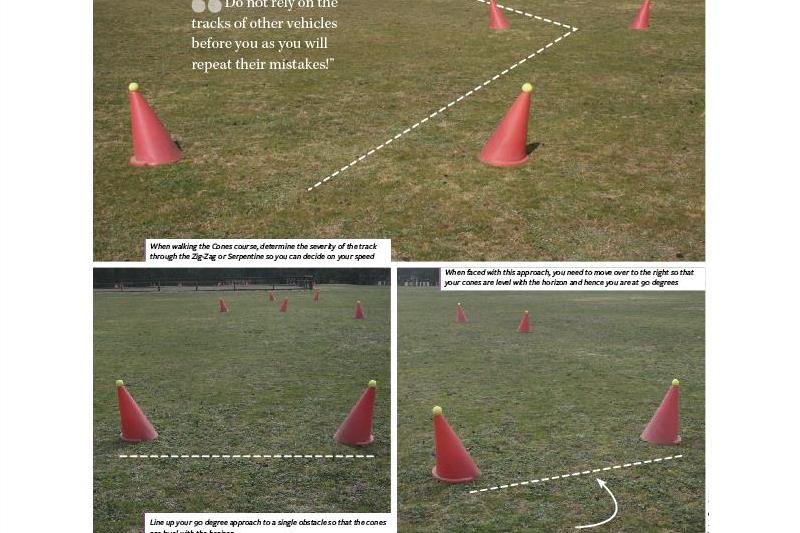
Other strategies for accuracy in your dressage test are: when commencing a serpentine from either A or C you need to be as close as possible to the short side before starting the first loop so that your first loop is accurate; ensure you drive to the long side in all serpentine loops; drive well into the corners but not so far as to interrupt the rhythm of your animals; at the end of diagonals, ensure you reach the track on the long side; touch your rear brakes when halting before a reinback, so that the turnout stops straight. When turning left or right at the top of the centreline, you must touch the track on the short side so as not to cut the corner.Warning: Do not rely on the tracks of other vehicles before you as you will repeat their mistakes!
Accuracy on the cones course is no less important and presents a more tangible and immediate result than the dressage arena. In addition to accuracy, time plays just as an important part as driving penalty free. On the subject of speed it is important to acknowledge that a big fast trot is preferable to a canter because lateral mobility is limited at the trot whereas at the canter the horse is freer to move laterally and is therefore more liable to waver and dislodge a ball.
When walking the cones course, pay special attention to the attitude of each cones obstacle as you need to minimise the likelihood of knocking a ball down. To assist you in this regard you need to present your turnout at 90 degrees to the obstacle to afford you the widest gap available. To achieve the 90 degrees you need to align the obstacle parallel with the horizon. If one of the cones is closer to you than the other this indicates that you are not approaching at 90 degrees. In which case, you should move over towards the further cone. There is also the golden rule when approaching an obstacle on a curve or circle of ‘driving to the outside cone’. This is because it is easier to tighten a turn than it is to open a turn out without dislodging a ball.
Also when walking the cones course, determine whether the Zig-Zags and Serpentines are set easy or difficult. To ascertain this, line up the central axis of the open multiple. If say, the cones Red A, White B, Red C and White D all line up along the backs of the cones, this means that they are set at their most difficult and require a bigger (and therefore slower) turn to negotiate them safely. If the fronts of the cones (the side closest to the competitor’s wheels) are all in alignment, that requires a smaller and easier turn. Except at major championships a Zig-Zag is usually set at 1.8m apart or even 2.0m. This allows you to reduce the number of turns by lining up cones A and B in a straight line, meaning you reduce the number of turns in the Zig-Zag from three to two (four elements but only three turns). This strategy is not advisable if the obstacle is set at 138cm for singles or 148cm for horse pairs, when you need to maximise your gaps. Also, when walking the cones course, look for areas where you can speed up to make up for the tighter and slower sections of the course. Remember two things; a big fast trot is less hazardous than a wavering canter and practicing cones with only a 10cm gap is not a waste of time!
First published in Carriage Driving October 2019